
Music Production Mixing Tips
Becoming an accomplished music producer is a process that can often take many years. Mixing music takes both technical skill and creativity to make a song interesting to the listener. Mixing is easily one of the hardest things to conquer in music production. It’s not that easy to get your own mix up to industry standard and your mix sounds just as good on any system, be it in the club, car, or your air pods, as the professional mixes. Of course, experience is the most important factor here, but there are also a few simple things that can improve your mix enormously and help you achieve your desired goal more efficiently. While some of the following advice may seem obvious, I can assure you that these music production mixing tips can improve your mix dramatically overnight.

DDMF Plugindoctor – The Plugin Analyzer
Although I think I should have created a new blog category for this unusual plugin, I still think it fits in quite well here.
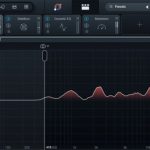
German company DDMF produces unique utilities and high-quality signal processors that are unmatched in the market. In my opinion, the all-encompassing plugin analyzer Plugindoctor is particularly worth mentioning. It can assist you in determining the audio quality of your latest and greatest product, whether you are a plugin developer yourself or a user who wants to know more precisely what a particular plugin is doing to your audio material.
No matter whether you want to examine an EQ or the effect of a distortion module or how the compressor works in certain settings – Plugindoctor shows exactly what is happening with the signal.
We have all been there: You buy a new tool, for example, and just by switching it on, you get the impression that the signal has somehow improved. Often, only simple details are added (such as slight mids/highs), which gives the listener a positive overall impression. I have noticed this myself with plugins such as “magic” EQs and filters, analog-sounding compressors, etc. But since I started using Plugindoctor, you can see it much more objectively.
Yes, humans lose their minds and money when a beautiful GUI plugin is released. Then it draws you in like magic, and before you know it, you’re thinking, “That has to sound better than XXX”. Here Plugindoctor shows in an impressive way that a new, sometimes expensive 3rd party EQ is no different from the internal EQ’s of the DAW except for the new amazing GUI.
I also found e.g. that a Waves plugin that some claim has “an analog button that just adds noise” actually activates an output limiter and adds harmonics as well. You can demonstrate the function of a plugin very well – truly amazing. Some plugins – especially in the sound design area – often have mysterious labels. Plugin Doctor is brilliant here too, as you can then see exactly how each button works.
I now add each new plugin to Plugindoctor first to examine its internal workings. While it is true that “if it sounds good, it is good” (Duke Ellington), it is still quite fascinating to discover the precise cause of the sound. It’s good to have a tool alongside your own ears that shows what is really happening “under the hood”. Plugindoctor is unique on the market and highly recommended!
ADPTR Audio Metric AB – Use reference tracks
Always compare your music production with your reference tracks. This helps you not to lose the mix balance. Always switch between your track and the professional mixings. A great tool for this is Magic A/B from Sample Magic (Splice).
A tool, which further possibilities (up to 16 reference tracks/set loop and cue points that sync with your DAW / Five super detailed analysis and metering modes etc.) is ADPTR Audio Metric AB. Just put it on your master bus after all the processing plugins you use (limiters, EQs, etc.).
Detail: Lower your reference tracks to the same volume level as your mix. Loudness Matching is the key here. With one click it matches the

reference track volume to your mix. This way you can focus of the quality of the audio, and not be fooled by the quantity of volume.
To see how your mix is progressing, download a few of your favorite tracks to use as a reference for your mix and refer to them often. One of the best tools you can have to speed up the mixing process and move on quickly is this. It’s similar to taking an exam with a cheat sheet next to you. This makes it simple to compare the functionality of your samples and instruments to a professional mix. In this manner, mixing problems are easily detected. “Is my kick too loud? Are the highs of my hats too sharp? etc.”. Whatever the issue, when you compare your mix to a professional mix, it will become evident, and you will be able to detect mix issues faster than ever.
Always flip between your track and the references in real-time (don’t stop your sequencer) and use also headphones for checking. Always listen on low-level and compare the references with your track on a spectrum analyzer (do they look similar?).
The ability to see spectrums for comparison when you truly need to be extremely critical of your master is far more feature-rich than this. However, I also use this to ensure that everything functions as it should when I create loops. This tool greatly improves your mixing and mastering skills. A must-have for any producer!


Track / Arrangement structure
Having unlimited possibilities in the production of a track can also quickly be counterproductive. You can get lost quickly. A simple way is to import a track you like into the DAW to study it’s structure. Divide the track into intro / build up, drop, main part, variation etc.
So you get a good feeling how a track is structured. The more you deal with the analysis of references, the easier it is to build your own tracks. See the whole thing as a rough, but extremely helpful guide for your own construction. This way you also learn much about the technical side of production as well.
Another interesting option is to play along with or add further elements to a professional track that has been imported into the DAW. The track then becomes denser and denser. At the end you can mute the original track and thus have an interesting framework to build your own track. New chords, a different tempo or a different key bring the track in a completely different direction. The possibilities are limitless.

iZotope Ozone Imager V2 Stereo Widening Plugin
I use Ozone Imager 2 on almost everything. Control the width of any track, perfect for making super-wide sounds or creating narrow, mono-like sources. You can easily get sounds to fill up the stereo image or improve your low-end process by narrowing the bass/kick drums.
The plugin can even convert mono audio sources to stereo without reverb or doubling! The new Stereoize II mode is perfect for subtle stereo enhancements. I love it!
Did I mention it’s free?
Start your mix in mono
There are many music production mixing tips available about this issue. In my opinion especially when it comes to techno: Start mixing in mono as it’s very honest and pure. Setting levels is much easier here. You can also detect phase issues immediately and masking can be heard easier (does my kick & bass really work well ?). Mono compatibility (phase cancellation) is also an important point. In the end – go back to stereo for panning, adding effects etc. If you can get a track sounding great in mono, it will sound amazing in stereo! This could be a real game-changer for you.
Mono your sub-frequencies
Always keep an eye on your correlation meter. As you can’t detect if a low frequency comes from the center or the sides of your speakers the sub frequencies should always be in the middle. Generally one can say everything below 150Hz should be mono. E.g. Ableton’s Utility does the job.
There is also an interesting psychoacoustic phenomenon: our hearing can no longer locate low frequencies below 109 – 120 hz in any direction.
At this point, I recommend going deeper into the subject of bass processing and mono compatibility and moving on to the next tool, which is simply breathtaking when it comes to this topic. It is a real specialist:


Tone Projects – Basslane Pro
I can now heartily recommend Basslane Pro in particular. It is the ultimate tool for creating powerful bass and managing low-end stereo width that that translates across formats and playback systems.
Basslane Pro offers sophisticated methods to boost width, punch, and low-end richness with applications far beyond mono’ing. With the special Stereo Harmonics function, you can add controlled low-end width and definition by injecting upper bass harmonics without interfering with the subs’ stereo information.
Not only for mastering – but also great for mixing and even single loops. I actually use this tool a lot when creating my samples – especially subbass loops.
Kick & Bass
The ultimate key to great Techno/EDM tracks is that these two elements work perfectly together. The depth and length of a kick should be directly related to the bass line. Both should not sit in the same sonic place. A booming sub-bass kick will clash with a similar subby bassline. Always tune the kick drum to the key of your track. As a result, mixing them together is much easier. I have dedicated an extra category to this important topic: “How to tune drum samples“
If you lack the necessary experience and therefore have problems with frequency overlays, I recommend iZotope Neutron (‘Unmasking feature’) or Wavesfactory Trackspacer. These amazing tools clear out frequency areas that conflict with another in a precise way.


In addition to sidechain (e.g. LFO Tool), simple EQing can also create transparency between kick and bass if you want to avoid that typical volume pumping. To create this, boost the fundamental key of the kick and cut that key at the bass. It is also advisable to raise the bass 1 octave higher to compensate the bass cut.
No matter how simple it may seem, another tip to avoid clash between subs: Long Bass >>> Short Kickdrum and Short Bass >>> Long Kickdrum
D16 Punchbox is fantastic sounding and very easy to use when it comes to creating excellent kick drums by simple layering. It’s also a beautiful fusion of sampling and synthesis with a huge library to choose from. Highly recommended!

Don’t overcook a track – less is more
Especially with modern, minimalist techno, it’s not about mixing many tracks together. Don’t overcoock a track by using too many different sounds. Less is more. Techno, Minimal & Deep House is more focusing on some very few elements that should be worked precicely into the track. It is about coordinating a few elements perfectly together and creating a big whole. Try to make every single sound as strong as possible – to use of your entire track. Always check if a sound is adding value to your track. A good sound choice is essential – “You can’t polish rubbish.” A few effect sounds with strong character are always an enrichment. I can recommend my awarded effect pack FX Revolution

AutoPan Plugin is the key
This technique of automatic panning lets your sound oscillate from left to right without being “out of phase” and is ideal for breathing life into your production. Set a very high vibration speed, if you want to create a broad, not clearly defined sound. But even minimal panning automation is great for pads, textures or effects. With movement, everything just sounds more interesting.
Plugins such as Soundtoys PanMan, Audio Damage Panstation, MeldaProduction MAutopan (FREE!) or even AutoPan in Cubase are very suitable for this. Personally, I think Cableguys Panshaper 3 is the best. It takes stereo control to a new level.
Organic feel on synth/bass sounds
You can create a more organic feel when you randomise the pitch of your synth/sampler. Almost all modern machines offer this function. If not – apply a small LFO modulation to the oscillators pitch. But don’t exaggerate it – less is more.
Avoid big and fat presets
Presets are often a great starting point to start producing right away. However, many fat-sounding presets cannot be used directly in the track because too much of the frequency spectrum is filled. The result is that you have to filter out the interference frequencies again using EQ when mixing. Otherwise, it quickly sounds muddy and muffled.
Therefore it makes sense to learn how a synthesizer works and how you can adapt presets / sounds to your own needs. The most sensible way / the key to success is to create your own sounds to stand out from the crowd.
If you lack the necessary experience and therefore have problems with frequency overlays, I recommend iZotope Neutron (‘Unmasking feature’) or Wavesfactory Trackspacer. These amazing tools clear out frequency areas that conflict with another in a precise way.


Soothe harshness
If you have a problem with sharp, biting frequencies/nasty resonances, I highly recommend Oeksound sooth2.
This plugin is a dynamic resonance suppressor. It identifies problematic resonances on the fly and applies matching reduction automatically with minimal artefacts. With Soothe2 it is possible to intervene in the complete frequency spectrum. The organic suppression of inharmonic signal components is unique. It’s easy to use and grants full control over the process. This tool saves an incredible amount of time in tracking down interfering frequencies.
Especially field recordings, which often don’t sound really balanced, Soothe2 works wonders with just a few clicks! With no EQ such a result could be achieved. It’s one of those magical tools that you don’t realize what an amazing job it’s doing until you hit bypass and A/B. One of my secret weapons!
Fat, full & wider bass sound
Just copy the original bass loop and distort the copy via overdrive (e.g. Soundtoys Descapitator). To gain width, use e.g. Soundtoys Microshift (a normal chorus effect of the DAW also works). Add a Locut Filter to get rid of the subs. Mix both to taste to get a wider sounding bass sound.
Also interesting is to duplicate the original bass and transpose it to +7 semitones (getting the perfect fifth on top of the original bass) and mix it by the volume fader.
Easy way to widen vocals/pads/atmos sounds
Plugins like Soundtoys Microshift, Waves Doubler/ADT or Eventide H3000 Factory do a great job here.
Especially Microshift is amazing!

Human Feel
Electronic music in particular can quickly sound rigid and mechanical. If all the elements of a track are programmed exactly in the grid, it quickly sounds as if a robot had programmed the track. You should always give certain elements a human feel. The whole track just sounds more harmonious – more human. In every sequencer there are different ways to make the whole “imperfect” sound – to give different elements a swing factor (off the grid). The Quantize function works wonders here.
But you can also automate certain elements. If you put e.g. the wet amount of a reverb on the modwheel the wet amount can effortless be controlled by the automation in real time, giving the whole thing a certain human feel.
It can also be interesting to slightly randomize the starting point of samples via automation. The most important thing is experimentation.
Listen to your track everywhere
As soon as you have finished a track, I recommend testing it on the different boxes / systems. Be it in the car, on headphones, handy, bluetooth speakers, etc. It is simply a matter of finding out whether the track works as it should on a wide variety of systems. In this way you can find out again whether certain details should be changed after all. If you have the opportunity, you should also test the track in a club.
Sounds strange but when you leave your room while your mix is playing you can also detect mixing problems from another point of view. Give it a try!
Finished Track ? How to move on
As soon as you have finished a track (after days / weeks or even months) I recommend leaving the track for a few days untouched and then listening to the track again with fresh ears / with a certain distance. It is not uncommon to hear errors that you did not even notice before while you were in the production flow. Now is the time to fix these errors. Then it makes perfect sense to get the opinion of other music producers. Third parties who have no relation to the track may notice other things that could be improved. Take your time.
These were my personal Music Production Mixing Tips. I hope you enjoyed reading this. I will update this category regularly.


