
Best Mixing and Mastering Plugins
Over the years, I’ve stayed in close contact with professional mastering engineers, constantly exchanging ideas and learning from their day-to-day work. One of them is Markus (aka Perla Audio). We regularly meet in our studios to share experiences, discuss sound design, mixing, and (stem) mastering – or simply jam together. So these reviews, therefore, also include input from people who master music full-time, ensuring a balanced and accurate perspective.
Besides that my top choices for mixing plugins are frequently requested, so I’ve put together the list below. It features only the very best tools, those that have earned their place in my DAW after years of testing and comparison. Some of these plugins simply stand out from the crowd and easily compete with expensive, rare hardware units. I also rely on them when refining sounds or giving my sample packs their final polish.
I’m convinced that plugins will replace most hardware in the near future – especially with the rise of AI-powered technology. The quality of digital processors is improving at an incredible pace. What will never be replaced, however, is the expertise and intuition of the human behind the controls, because music is about emotion, and no machine can replicate that.
My list of the Best Mixing and Mastering Plugins is updated regularly. For detailed specs, please visit the manufacturers’ linked websites.
izotope Ozone 12

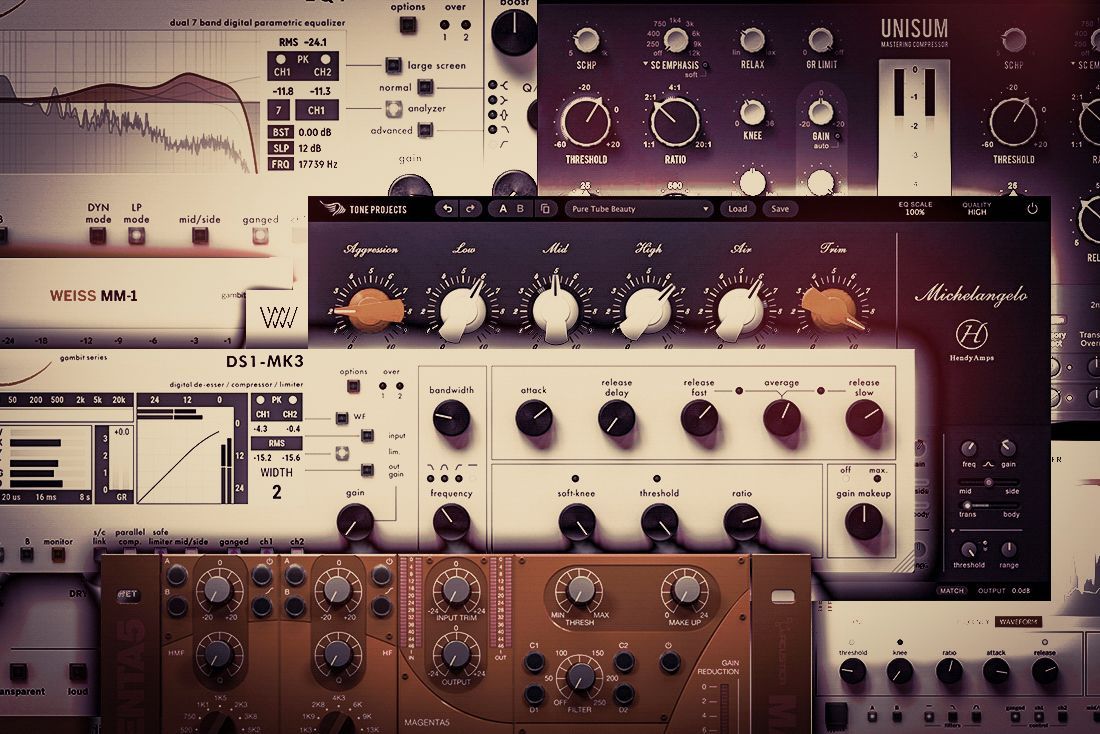
Weiss Complete Collection 2

To those who believe these advertising terms sound over the top, the truth is precisely that. Without getting too specific just at this point, the Weiss Complete Collection 2 is excellent and well worth the money. Weiss Engineering and Daniel Weiss have approved and closely collaborated in developing the included plug-ins. Weiss is well known for their high-end audio hardware processing gear in the audio industry for many years. Below I will discuss the 5 plugins I use and mainly work with. Enough of the introductory words – now to the details:
Weiss. It’s the name in audio mastering. Synonymous with sound quality, the value of the Weiss Engineering suite of mastering tools is undeniable. But with premium instruments come premium price tags. This hand-picked bundle allows you to own the gold-standard in mastering gear for pennies on the list price. Take your work to a caliber heard, or rather unheard, on virtually every major record of the past two decades. Created in collaboration with Weiss Engineering, these exactingly modeled plug-ins bring unsurpassed mastering excellence into the DAW-based studio. Compression, limiting, de-essing, mix maximizing, equalizing; get all the essential mastering elements at an exceptional value.

Weiss DS1-MK3
Among this series, my favorite is the Weiss DS1 MK3. A well-known tool that is used by professional mastering engineers worldwide and it is now available as a plugin from original digital hardware.
Both the hardware code and the DS1-MK3 plug-in share the same code. This means that the Weiss DS1-MK3 mastering processor is not a precise emulation; rather, it is the same product with a truly transparent and powerful sound quality. Although it takes some time to get into, the reward is a Weiss sound that is renowned for being very transparent.
So what do you obtain? What is my work process?
Read my full Weiss Collection review

Oeksound Bloom
Oeksound already sports two highly regarded intelligent fixers (Soothe2 and Spiff) in their lineup. To this day I use these tools very often for my sound design. So of course I was excited to see what the new release offers.
Bloom is an adaptive tone shaper. You can use Bloom to modify your sound in subtle or dramatic ways, while Soothe2 concentrates on resonances and is more often used to “fix” harshness and troublesome resonances. Bloom is not a standard multiband compressor or dynamic eq. After analyzing the incoming signal, it boosts or cuts frequencies to adjust the perceived tonal balance of the sound. The adaptive nature of the corrections means that they vary continuously based on the input signal.
Bloom automatically removes unneeded components and boosts where needed to create a more balanced sound. You have the ability to adjust the processing to suit your tastes.

To produce a well-balanced sound, Bloom automatically modifies other frequency areas to make up for changes made in one. Bloom’s UI is based on their prior plugins and has a nice, simple, and intuitive design. The frequency detection appears to be very intelligent, which I really like. It includes many excellent, easily adjustable presets for both corrective and tone-enhancing effects.
But precisely what is it? It appears to operate far more precisely than a standard multi-band compressor that might have 5-6 bands. Under the hood, Bloom seems to use many more multi-band compression bands, each of which has its own intensity that can be changed. As such, it serves as an accurate multi-band compressor with automatic tone flattening. Bloom is a kind of colour box. It can give your sound grit, character, or glue. Somehow, it is comparable to Gullfoss in certain aspects, but Gullfoss lacks the mid side, squash, and control. But it’s not without reason that many producers have trusted Gullfoss since its release in 2018. I think Gullfoss is the biggest competitor here anyway.
However Bloom is incredibly simple to set up. It’s a time saver! But I believe the desired outcomes that are possible with Bloom can also be achieved with the connection of several other plugins. Nevertheless, it’s always appreciated when something can be squeezed into a single plugin with a few knobs rather than having multiple parallel chains set up, especially these days, time is money.
Bloom also improves the warmth and clarity of my samples, always producing results that sound natural. Indeed, it does a pleasant job of adjusting each material. Bloom also could reveal details of a recording to the surface and is also great for bringing individual tracks to life. Amazing things could happen when you turn the amount knob toward the squash settings (a compressor is added to the mix).
The pairing of Bloom and Soothe2 is appealing to me. For instance, on the one side, I use Soothe2 if I have a field recording with some unpleasant resonances. On the other side I use Bloom if I’m pleased with the outcome but think it doesn’t fit the overall vibe of the other samples of my sample pack. Thus, Bloom provides the solution for tonal adjustments that direct the sound in a particular direction.
In conclusion, if you have the time and/or access to a number of other tools (like Soundtheory Gullfoss, Voxengo TEOTE, Fabfilter Pro-MB, etc.) that you are already familiar with, Bloom is not strictly necessary. I believe Bloom needs more adjusting than, say, Gullfoss. Gullfoss is quicker, but Bloom allows the user to have more control over the final audio. So I can recommend Bloom.
Here’s a Quickstart video that explains the basics of Bloom
https://www.youtube.com/watch?v=VBpY4BZUrmg

Tone Projects Unisum Mastering Compressor
Is this your next go-to compressor? I guess so! You might say: „This is just another compressor like all the others I own, isn’t it?“ – „No, definitely not!“ So why is it different from other compressors I used in the box?
Because Unisum is outstandingly doing things, but it is always on the better side. It feels like the music comes to life even if you push it 1-2 db harder than other compressors. Imagine pulling a slack robe, with Unisum, the music gets tightened without
losing the 3d image, as a side effect, it is more defined. Very impressive, never felt that on any other compressor plugin before. I find myself to be the master of controlling all the dynamics, groove, and vibe while mastering a whole song with Unisum. You can add your special „tone“ that fits with the mix. I can realize warmth and alter transients and frequency response in a way that I never experienced before in a compressor plugin without any compromises in quality. Speaking about quality here, choose between real-time, high, and pristine modes for low latency and oversampling behavior. I am usually working in high mode. Dry/Wet knob helps to drive even dramatic gain ranges for parallel compression and blend them into the original signal by feeling to thicken up the entire signal.
With its 15 different styles, there are almost no limits – get the compressor vibe you want by just selecting the style (Groove-Mu, Opto, Fast Fet, etc.) In all blind shootouts that I did, I was able to note down a 100% hit rate of detecting the Unisum (with the great feature of auto gain activated). The LR and MS functions help me a lot during the mastering process, being linked and unlinked or somewhere between. The limit function is another feature I like because it limits the compressor’s gain range to the amount you need. The tone character of Unisum is adjustable by dialing in the settings for the RMS detector in the control section at the bottom of the plugin.


All the included presets (by Bob Macc & Holger Lagerfeldt etc.) are my go-to starting points so you can tweak your mixes or stems to where you want them to be, easily, fast, and intuitively. It is even a good way to understand all the functions of Unisum better if you are new to some functions this plugin offers. Especially the extended control section of the plugin is taking so much time to explain, so I can only mention some features shortly: RMS + Peak Level Detection for the side-chain (3 bands and adjustable) and weight function so that it might also work like a de-esser if you want. Attack and Release modifiers will make Unisum act differently to quieter and louder parts of the mix. That’s so impressive!
Here is how I work with Unisum: I am searching for a preset that closely fits the feeling and vibe I want to get. After that, I adjust the side-chain frequency, the attack, and release time to my taste, then set the gain range limit (0.5-3db most of the time). Then play around with lin or log release and the relax knob to find the sweet spot. Auto gain also helps me not to be fooled by +0.2db or more loudness difference (the louder is always the better). Sometimes I use HYGGE mode (even & odd harmonics). This gives me a beautiful saturation with a decent low-cut @ 20hz (6db/octave ) plus a very little boost from 20hz-120hz and above 10khz if needed.
You can determine that Unisum was built in collaboration with mastering professionals. It has character when you need it and it can be a fully creative control tool with the settings you find at the bottom of the plugin (Controls). This is by far it is the most „analog sounding“ compressor plug-in I’ve ever used. You need to test Unisum. But be aware, if you install the trial version, you will hit the buy button very soon: I am sure!
Tone Projects Michelangelo
Chris Henderson from Hendyamps created Michelangelo, an analog all-tube stereo EQ and harmonics generator by hand. It is one of the most amazing hardware EQs on the market right now. The exclusive plugin version has been improved with unique features that are only available „in the box“ and it has been meticulously recreated.
When you open up the plugin the default setting already gives you a very nice saturation and a great EQ curve with a slice dip from 1khz to

5khz plus an airy push at 20khz. The plugin has 6 dial knobs. Aggression, low, mid, high, air, and trim. One great feature I have to mention first is auto gain. But the most important is the match feature. It analyses so precisely that you can not be tricked by loudness. Great! Because of these gain functions, you can easily compare the results before and after so that you are not fooled by the feeling that louder is always better. Not every plugin can claim that.
So let’s start with aggression. It pushes the amount of saturation the plugin adds to the signal. You have clean (0), norm (5), and hot (10) calibration, or somewhere between the way you like. Clean has little upper harmonics, while hot offers lots of them. By dialing in the aggression knob, the harmonics start to be recognizable in very nice tones of colors. Also, you can push the EQ curve with this knob, which sounds to me very beautiful. I get a vibe like a tilt EQ pushing the lows from the bottom up to 4-5khz the more you dial it in.
The Low Band is adjustable to 80Hz or 150Hz and has a beautiful, full, and rich sound to it. The 80Hz band gives you a little dip at around 150Hz. The Mid Band has 2 modes that are called flat and full. In flat mode, the band has its peak at 180Hz with a very broad curve. In full mode, the peak is at 500Hz with a narrower curve. The High Band also has 2 modes. Smooth and sharp. The smooth mode works like a high shelve starting at 1khz while the sharp mode goes down from 20khz to 200hz in a very musical vibe. The Air Band boosts the frequency at 20khz for a very open sound stage experience. To be honest, I never heard such a nice air band as most digital EQs tend to sound harsh or flat.
Now let’s open the control area at the bottom of the plugin – the fun begins: All 4 EQ bands can also be used as dynamic EQ, which the hardware doesn’t offer. You can use it also in MS mode. Transient/Body mode lets you focus on the transient or reduce the EQ effect on the transient. As an example, if you want to push the highs without adding harshness, boost the body of the band.
On the left side, you can find character control knobs for tube comp and tube blend (from triode to pentode) and my favorite feature: spread and crosstalk. To me, this is where the real magic happens. The music gets depth that I only get when using hardware. It just opens the sound in a 3d space. What happens here is realizing the imperfection of the L+R channel of every hardware. To me, that is always one of the biggest differences when I hear shootouts from hardware to plugins. This 3d depth is missing most of the time in plugins, but not here – pretty amazing!
If this wouldn’t be enough. Tone Project offers another 2 extra bands if needed (Low Shelf, High Shelf, Bell Wide, and Bell Narrow) plus high and low pass filters. Overall the 4 distinct bands sound simply amazing and musical. You can modify the tone of the mix without sounding unpleasant at any time.
Michelangelo gives you a wide variety of flavors and colors. The pentode mentioned above has a beefier, richer, warmer tone. The triode also sounds thinner, sharper, and dirtier. Although Michelangelo can be a simple EQ, you can fully explore the sound by using the additional controls. It’s incredible how musically the different bands of the EQ interact. Besides that, I’ve never heard of a plugin with better EQ tube modeling than this one. Michelangelo can also convince on individual samples and I use it also to get the finishing touches with it. Here as well, Tone Projects did not disappoint! This equalization seems very analog. Strongly advised!

Acustica Audio Magenta 5
The channel strip, preamplifier, stereo equalizer, and compressor (mono and stereo) that make up the Magenta5 plug-in bundle are modeled after the expensive boutique instruments Variable Mu, Voxbox, Massive Passive, and Slam.
I make extensive use of the EQ unit. Acustica’s use of sample technology gives the plugin a very analog sound. There is a slight latency in the process, but you can overlook it if you are rewarded with this sound after a short while. Wonderful 3D sound that can be produced by very few plugins is also created here. With Magenta, sterile sounds get a wonderful analog sound character. If you set the Magenta e.g. on a drum bus, everything sounds as if it were made from one piece. It does a great job of tightening up the bottom end and adding a beautiful analogue-like top end to the entire mix.
My favorite bands of the Magenta5 EQ are 220hz, 850hz, 1,5khz and 13khz. I push the 220hz band if I need the music to have a fuller upper bass presence and a warm-sounding character, I reduce when the music sounds too muddy and muffled. 850hz is my daily go-to band, wonderful „loudness“ is generated by raising this band. But be careful, if you overdo the music will sound very nasal and cheap. 1,5khz is used if I need musical elements to cut through. 13khz is in use to add a bit of sparkle and transparency to the mix in a very nice manner. Activating the Pre amp is another great trick that will make your highs sound more authentic. Small side information: If you, like me, don’t like the originally red skin, you can install this black one as an alternative. Your eyes will thank you.
Since Acustica has no license rights, there are no original names from which hardware units were sampled. But there is an impressive unofficial list at https://justpaste.it/AcusticaAudioAcquaMasterList
The most sought-after hardware units are made so desirable because this incredible plugin replicates the exact character, frequency, and phase response of the sampled devices down to the smallest factors. The fact that you can of course operate these plugins on different tracks at the same time opens up breathtaking possibilities in the mix. I already had the opportunity to compare a Manley hardware unit in a blind test. Because the differences are so tiny, I would still choose Magenta even if I could only use one instance of this unique plugin.
Black Box HG-2 / HG-2MS | High-End Tube Saturation
The Black Box HG-2 copied the famous hardware unit (about $3000) and added a few useful features. It adds saturation, harmonics, natural compression, and increased RMS for mixing and mastering. The extended version Black Box HG-2MS is a great example of what happens when a developer expands beyond the limits of hardware emulation. To say it right away, The HG-2MS is a swiss-army knife of colouration. In the following I will mainly focus on the HG-2MS model as this upgrade offers amazing new flexibility.
The pentode and triode gain stages form the HG-2’s core. For musical distortion, the triode tube produces gritty third-order harmonics,

while the pentode tube produces even-order harmonics. By pushing these gain stages against the output and each other, you can create a range of sounds. The pentode feeds the triode. A parallel circuit that is independent of the first pentode stage is also operating off the input. It provides distinctive saturation and harmonics.
Read my full Black Box review
These are my best Mixing and Mastering Plugins. I hope you enjoyed reading this.


